At River, we actively encourage our clients to self-custody their bitcoin. This is because, as Bitcoiners, we know that managing your own custody reduces counterparty risk, increases censorship resistance, and enhances privacy.
By “self-custody”, we mean that you are the person responsible for managing the public/private key pairs associated with your bitcoin. Becoming comfortable with key management is crucial in Bitcoin, because whoever controls your keys, ultimately controls your bitcoin.
Not your keys; not your coins!
This guide will walk you through the process of setting up, backing up, and using a self-custody Bitcoin mobile wallet. Our goal is to empower you to feel comfortable managing your own keys by following the five steps outlined below, which should take about 30 minutes.
That’s right, half an hour to learn to secure your bitcoin—well worth your time!
For an in-depth exploration of best practices for long-term bitcoin storage, we recommend our research report, Navigating Bitcoin Storage.
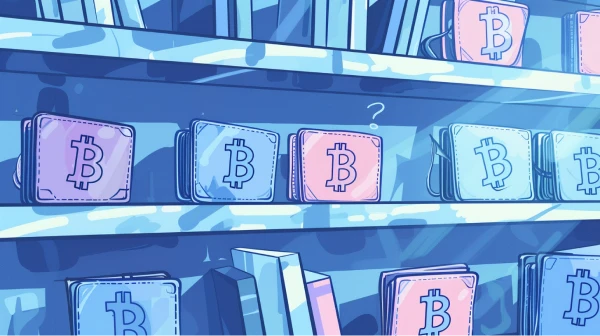
Value thresholds for Bitcoin wallets
Learning self-custody is a bit like learning to swim: before diving straight into a lake (hardware wallet), or even the ocean (multisig wallet), you’ll want to practice in the shallow end of the pool (mobile wallet).
When deciding which wallet to use, first consider how much value (in dollar terms) you intend to self-custody.
| Wallet Type | Recommended Threshold | Physical Comparison |
|---|---|---|
| Mobile, Browser, or Standalone Desktop Wallets | $1 — $300 | The wallet in which you carry petty cash and credit cards. |
| Single Signature Hardware Wallet | $300 — $75,000 | A safe inside your home that requires a single PIN or combination. |
| Multisignature Hardware Wallet Setup | >/= $75,000 | A vault behind steel doors, monitored by armed guards. |
*Additional resources covering hardware wallets, and multisig service providers are listed at the end of this article.
➤ Learn more about different kinds of Bitcoin wallets.
How to use your self custody Bitcoin wallet
We will be using Blue Wallet for the walkthrough portion of this guide. Blue Wallet was selected because it balances an intuitive user experience with a variety of advanced features for power users, such as connecting the wallet to your own lightning node—which is out of scope for this tutorial.
➤ Learn more about how to choose a Bitcoin wallet.
Keep in mind that Blue Wallet is a hot wallet, and should not be used to store large amounts of your bitcoin savings. There are many other wallets with their own benefits and drawbacks, but the focus of the tutorial is to teach you the principles of using any of them to secure your bitcoin.
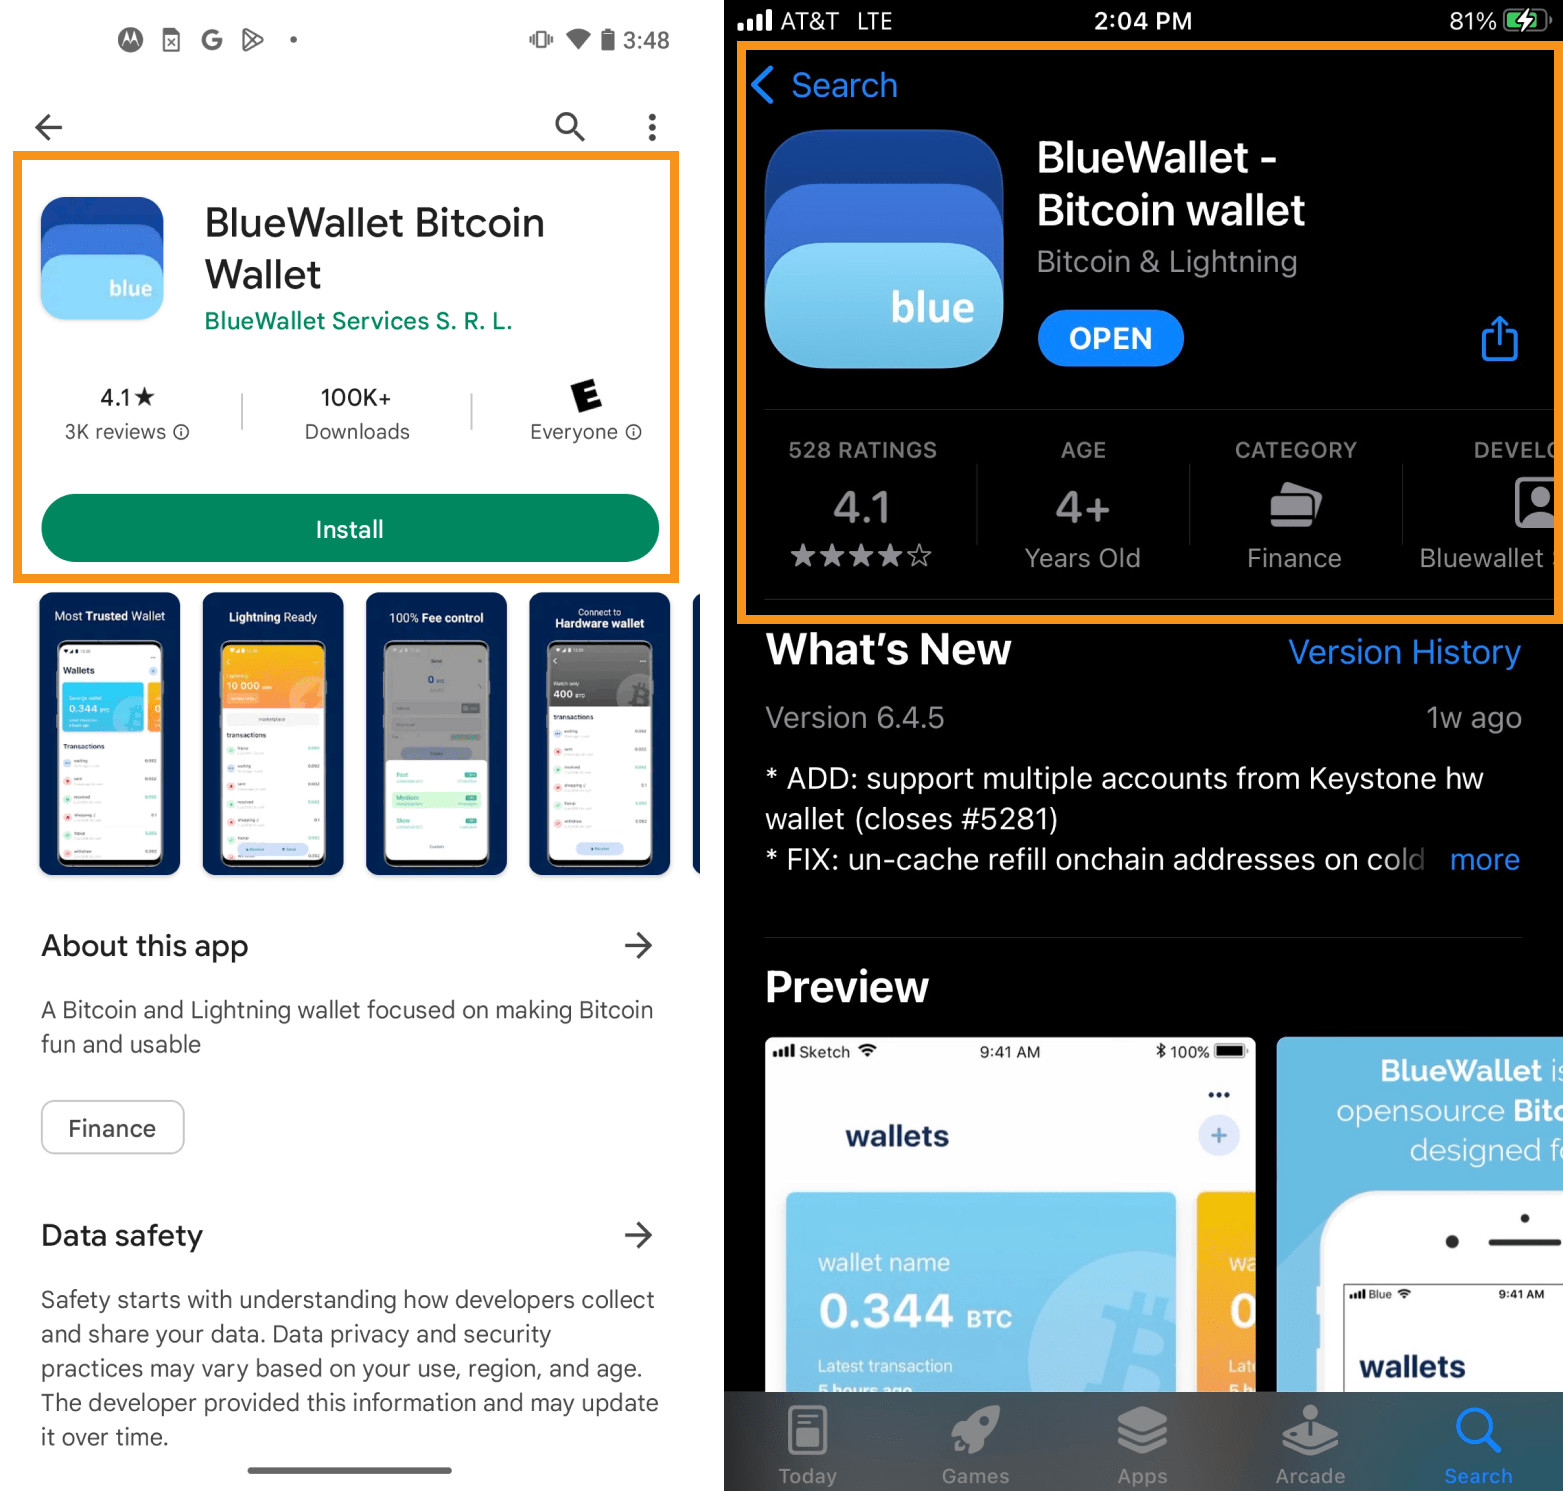
Step 1: Wallet download & installation
The first step is to download the wallet onto your mobile device. To ensure that you only download official software, we will provide direct links to the App Store and Google Play store.
It is important to understand that not every wallet is secure, so do your research and be careful about what you use. Opt for widely adopted wallets with a long-term track record.
Next, add a PIN code to the application—this is not mandatory, but highly recommended as it adds another layer of security.
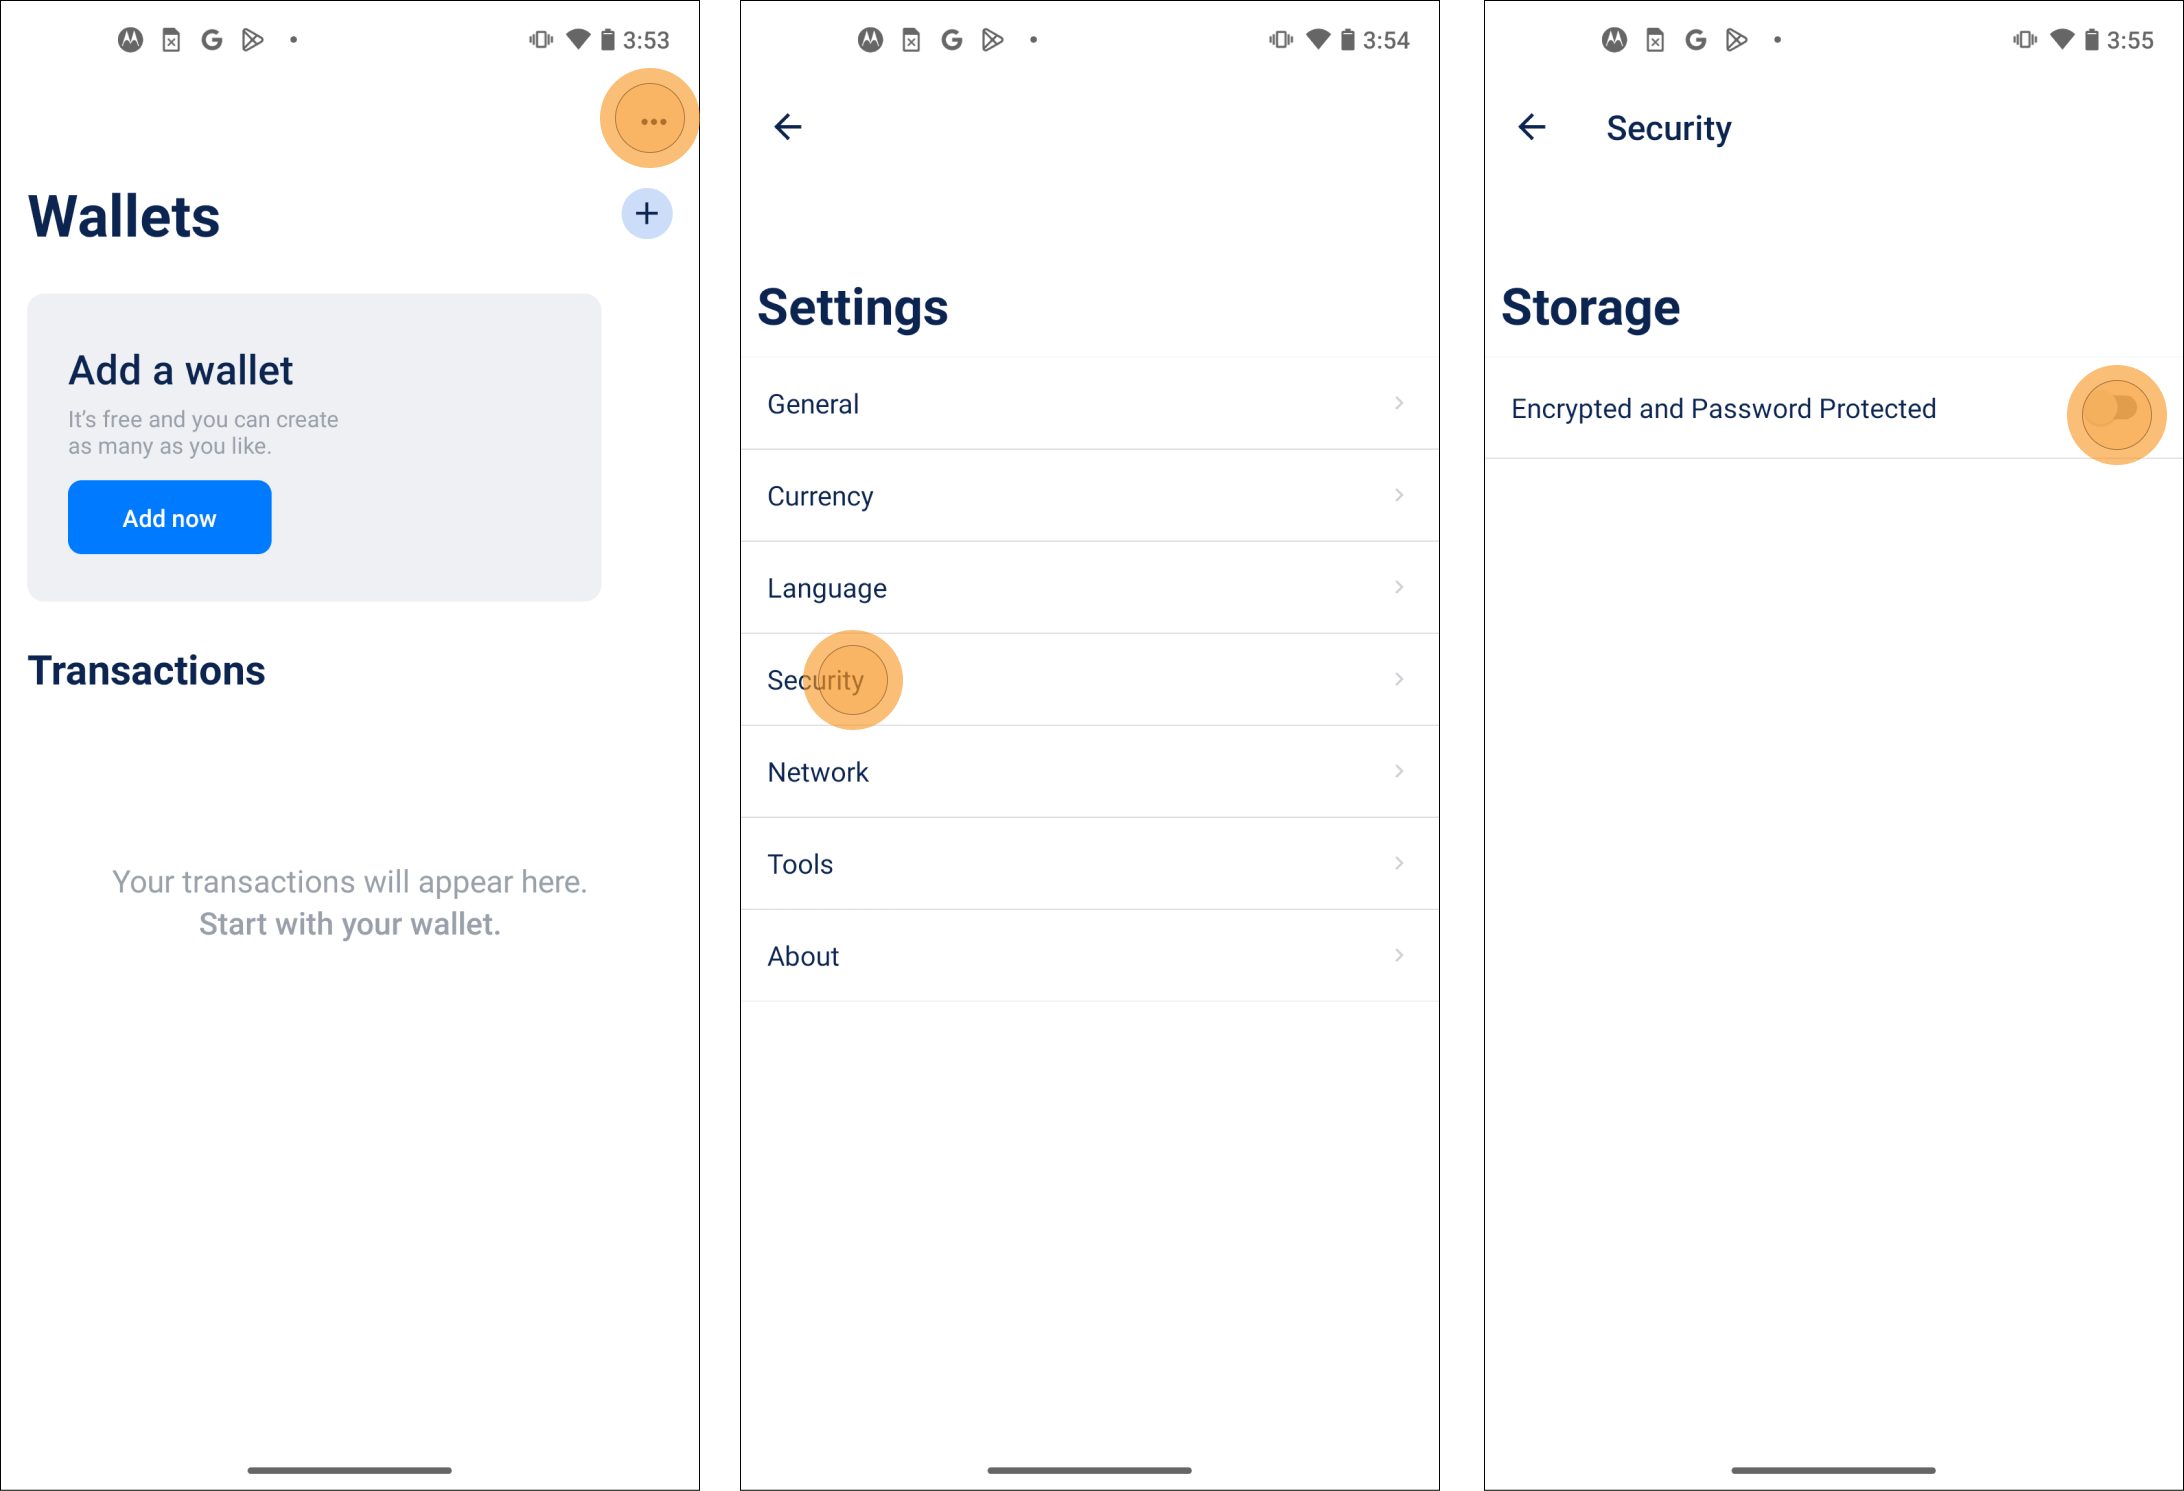
- To enable the PIN code, tap the
...button at the top right of the screen. - Next, select
Security, and then toggle theEncrypted and Password Protectedoption to “on”. - Once you trigger this, you will be prompted to enter a pin for the application. Write this PIN down on a sheet of paper.
Step 2: Wallet back-up process
You are now ready to initialize and back-up your Bitcoin self custody wallet.
- Navigate back to the home screen, and select either the blue
Add nowbutton or the+button underneath the...button. - You will then be prompted to give your wallet a name and select the type of wallet; choose the
Bitcoinoption, and finally tapCreate.- Creating a Lightning wallet is also possible in Blue Wallet, but you must connect it to your own node. This is an advanced feature; please educate yourself before diving into this.
![]()
Next, you will be shown a screen displaying your wallet’s seed phrase—be absolutely certain to write these 12 words down on a piece of paper in the exact order they appear. Double (and triple) check that your written words exactly match what is on the screen, because your bitcoin depends on it.
If you write your words down incorrectly, or in the wrong order, you likely won’t be able to recover your bitcoin.
- Once you have confirmed, tap
Ok, I wrote it down, and navigate back to the home screen.
Do not store these words on any internet-connected device; pen and paper are the better option. Try not to store your seed phrase somewhere obvious, like on top of your desk or in your sock drawer. Get creative, and make multiple copies!
What are seed phrases?
Your wallet’s seed phrase is a very large number from which all addresses, private keys and signatures are derived. The large number is represented as a series of 12 or 24 words because that format is more easily accessible by humans.
Importantly: wallets do not control bitcoin, funds can only be moved with private keys. This means that even if the wallet software is discontinued, you can still access your bitcoin as long as you have your seed phrase.
➤ Learn more about seed phrases.
Bitcoin educator Andreas M. Antonopoulos provides more context regarding seed phrases here:
Step 3: Receive a test transaction to your mobile Bitcoin wallet
After you’ve created and backed up your self-custody Bitcoin wallet, it’s time to use it. Before receiving any high-value transactions, it is wise to first send a relatively low-value test transaction to ensure that the wallet is working properly.
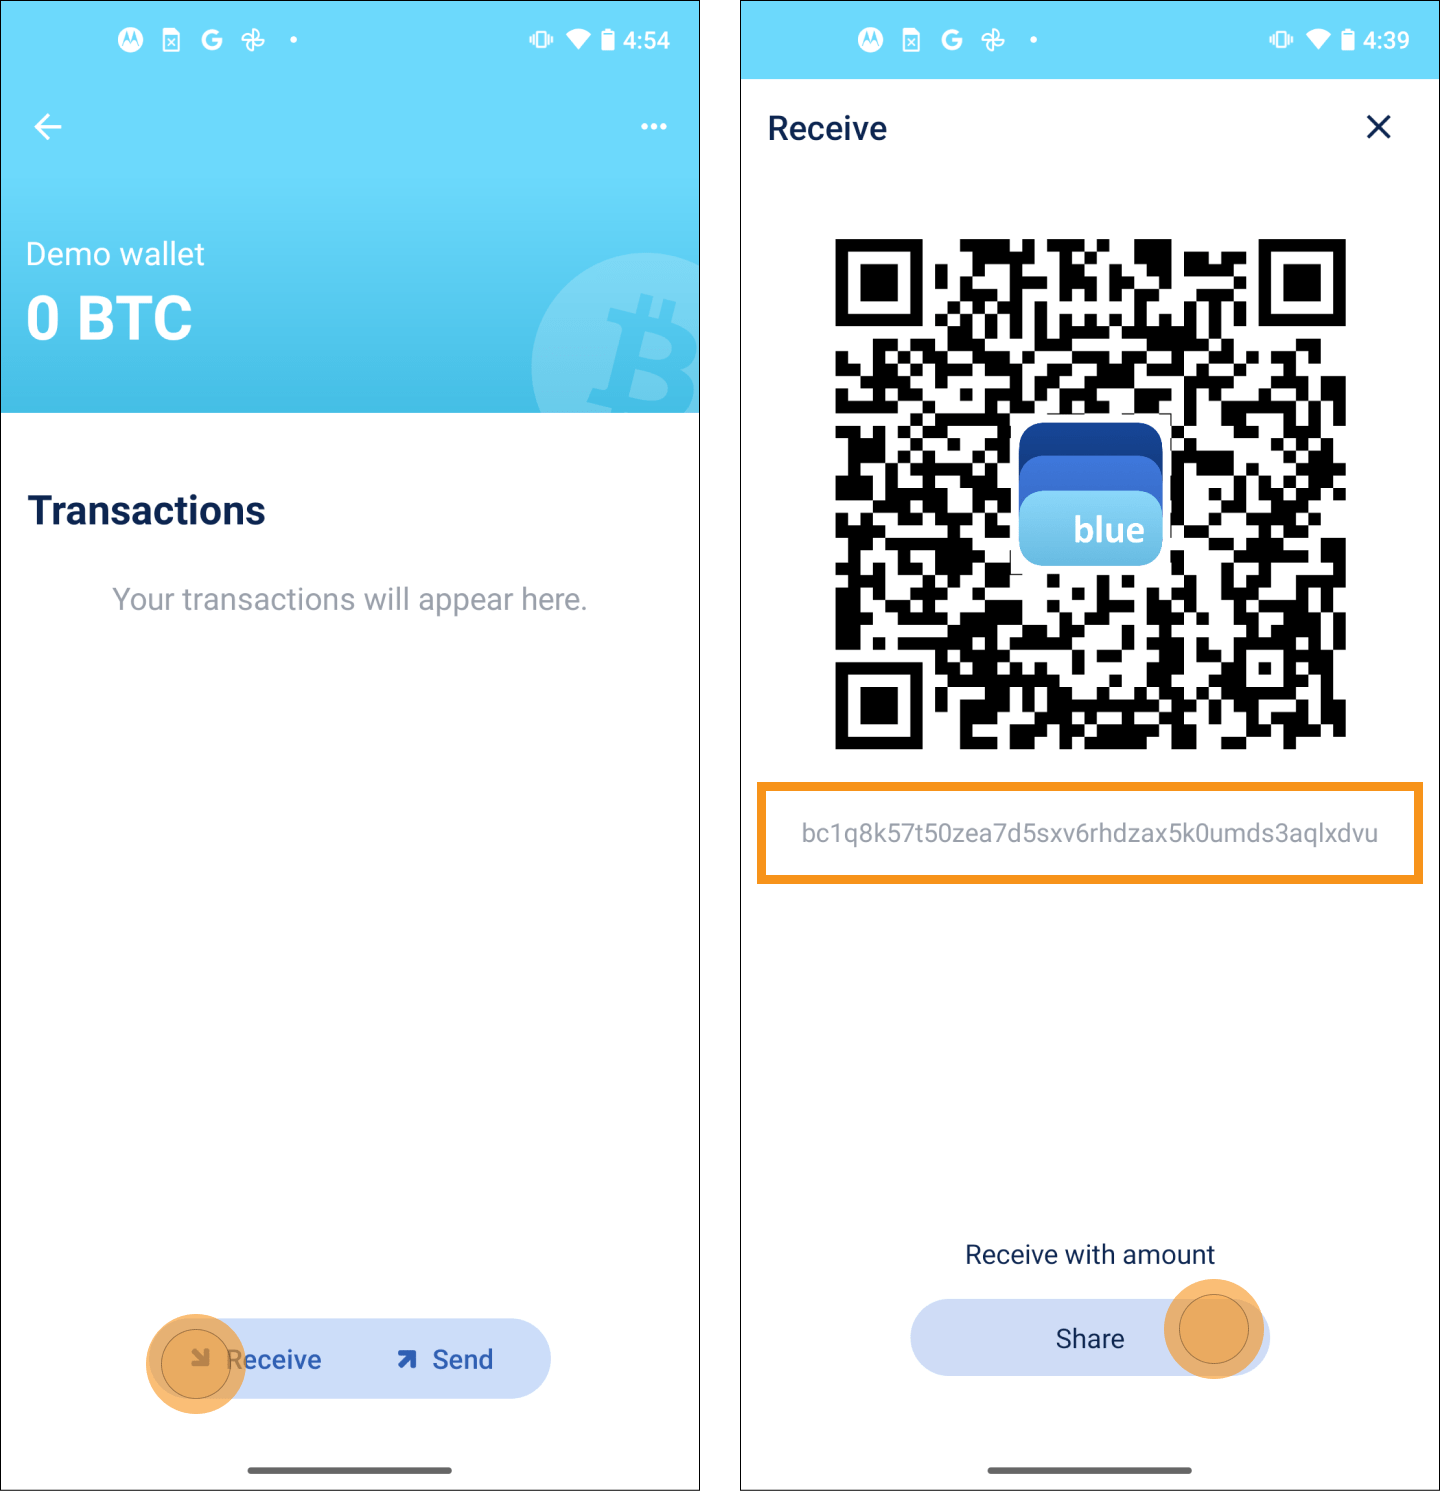
- Navigate to the home page wallet you have just created and tap
Receive. - You will then be shown a screen with a QR code and an alphanumeric string of characters—both formats represent the same address.
- You can scan the QR code with another device, or share the address by tapping the string of characters or tapping
Shareand sending the address to yourself.
You can now send yourself a test transaction—just make sure to add a transaction fee. Your wallet will automate the fee estimation process, but you can always double-check the going rate at mempool.space or your preferred block explorer.
- Once the test transaction has been successfully broadcast, a screen will appear showing a circle icon with three dots inside. This indicates that the transaction is pending.
- Navigating back to the home screen of the wallet, you should see your pending transaction displayed beneath the Transactions label.
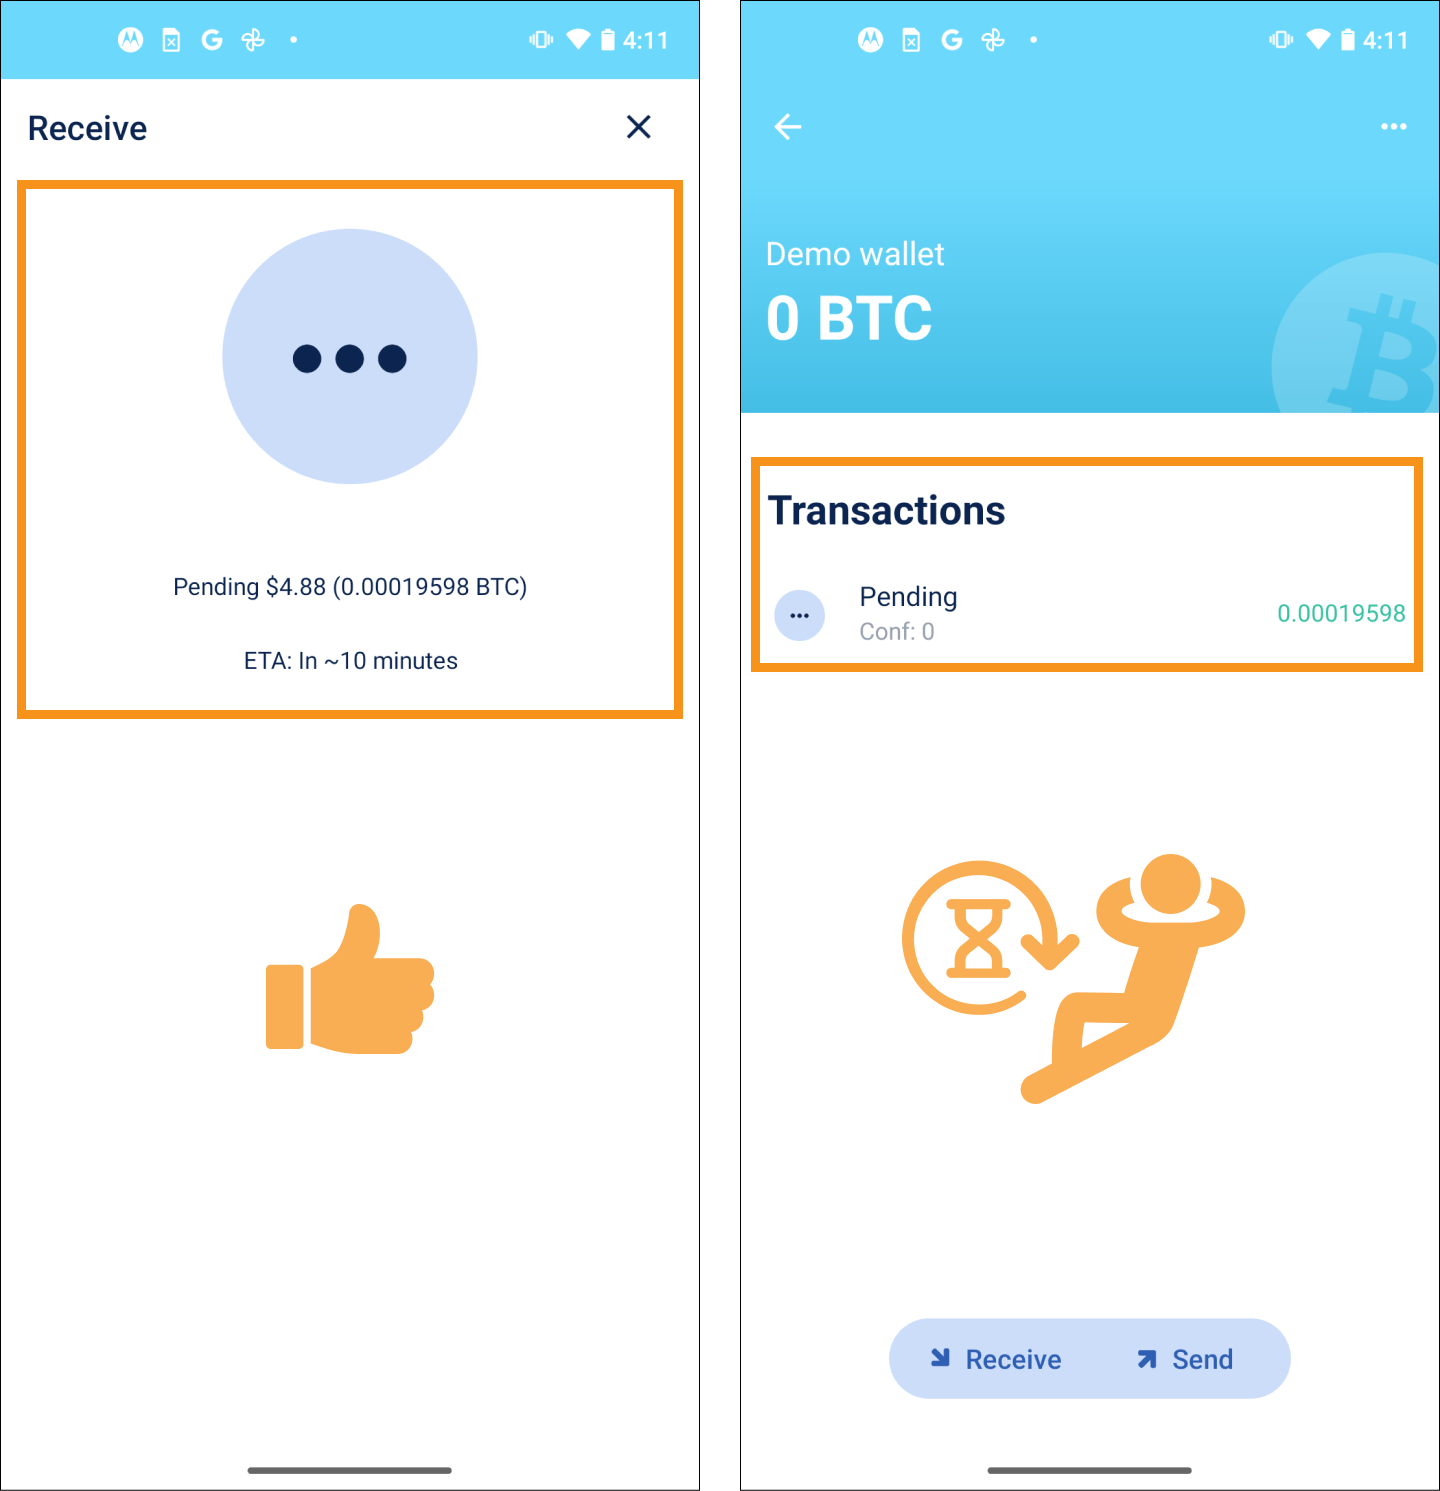
All that you need to do now is wait for the transaction to be confirmed by being included in a block by Bitcoin miners. As a general rule, 6 confirmations represents final settlement.
Step 4: Deleting your Bitcoin wallet and restoring it from seed phrase
This next step is not necessary in order to use your wallet to send and receive transactions. However, it is highly recommended that you follow this section as the exercise will demonstrate the power of seed phrases in real-time.
This may seem like a crazy or unnecessary step, but if you learn how to recover a wallet, you can sleep tight knowing you can always recover your bitcoin.
Before deleting the wallet and restoring from the seed phrase, confirm that the seed phrase you have written down exactly matches the seed shown on screen #3 below in both spelling and word order.
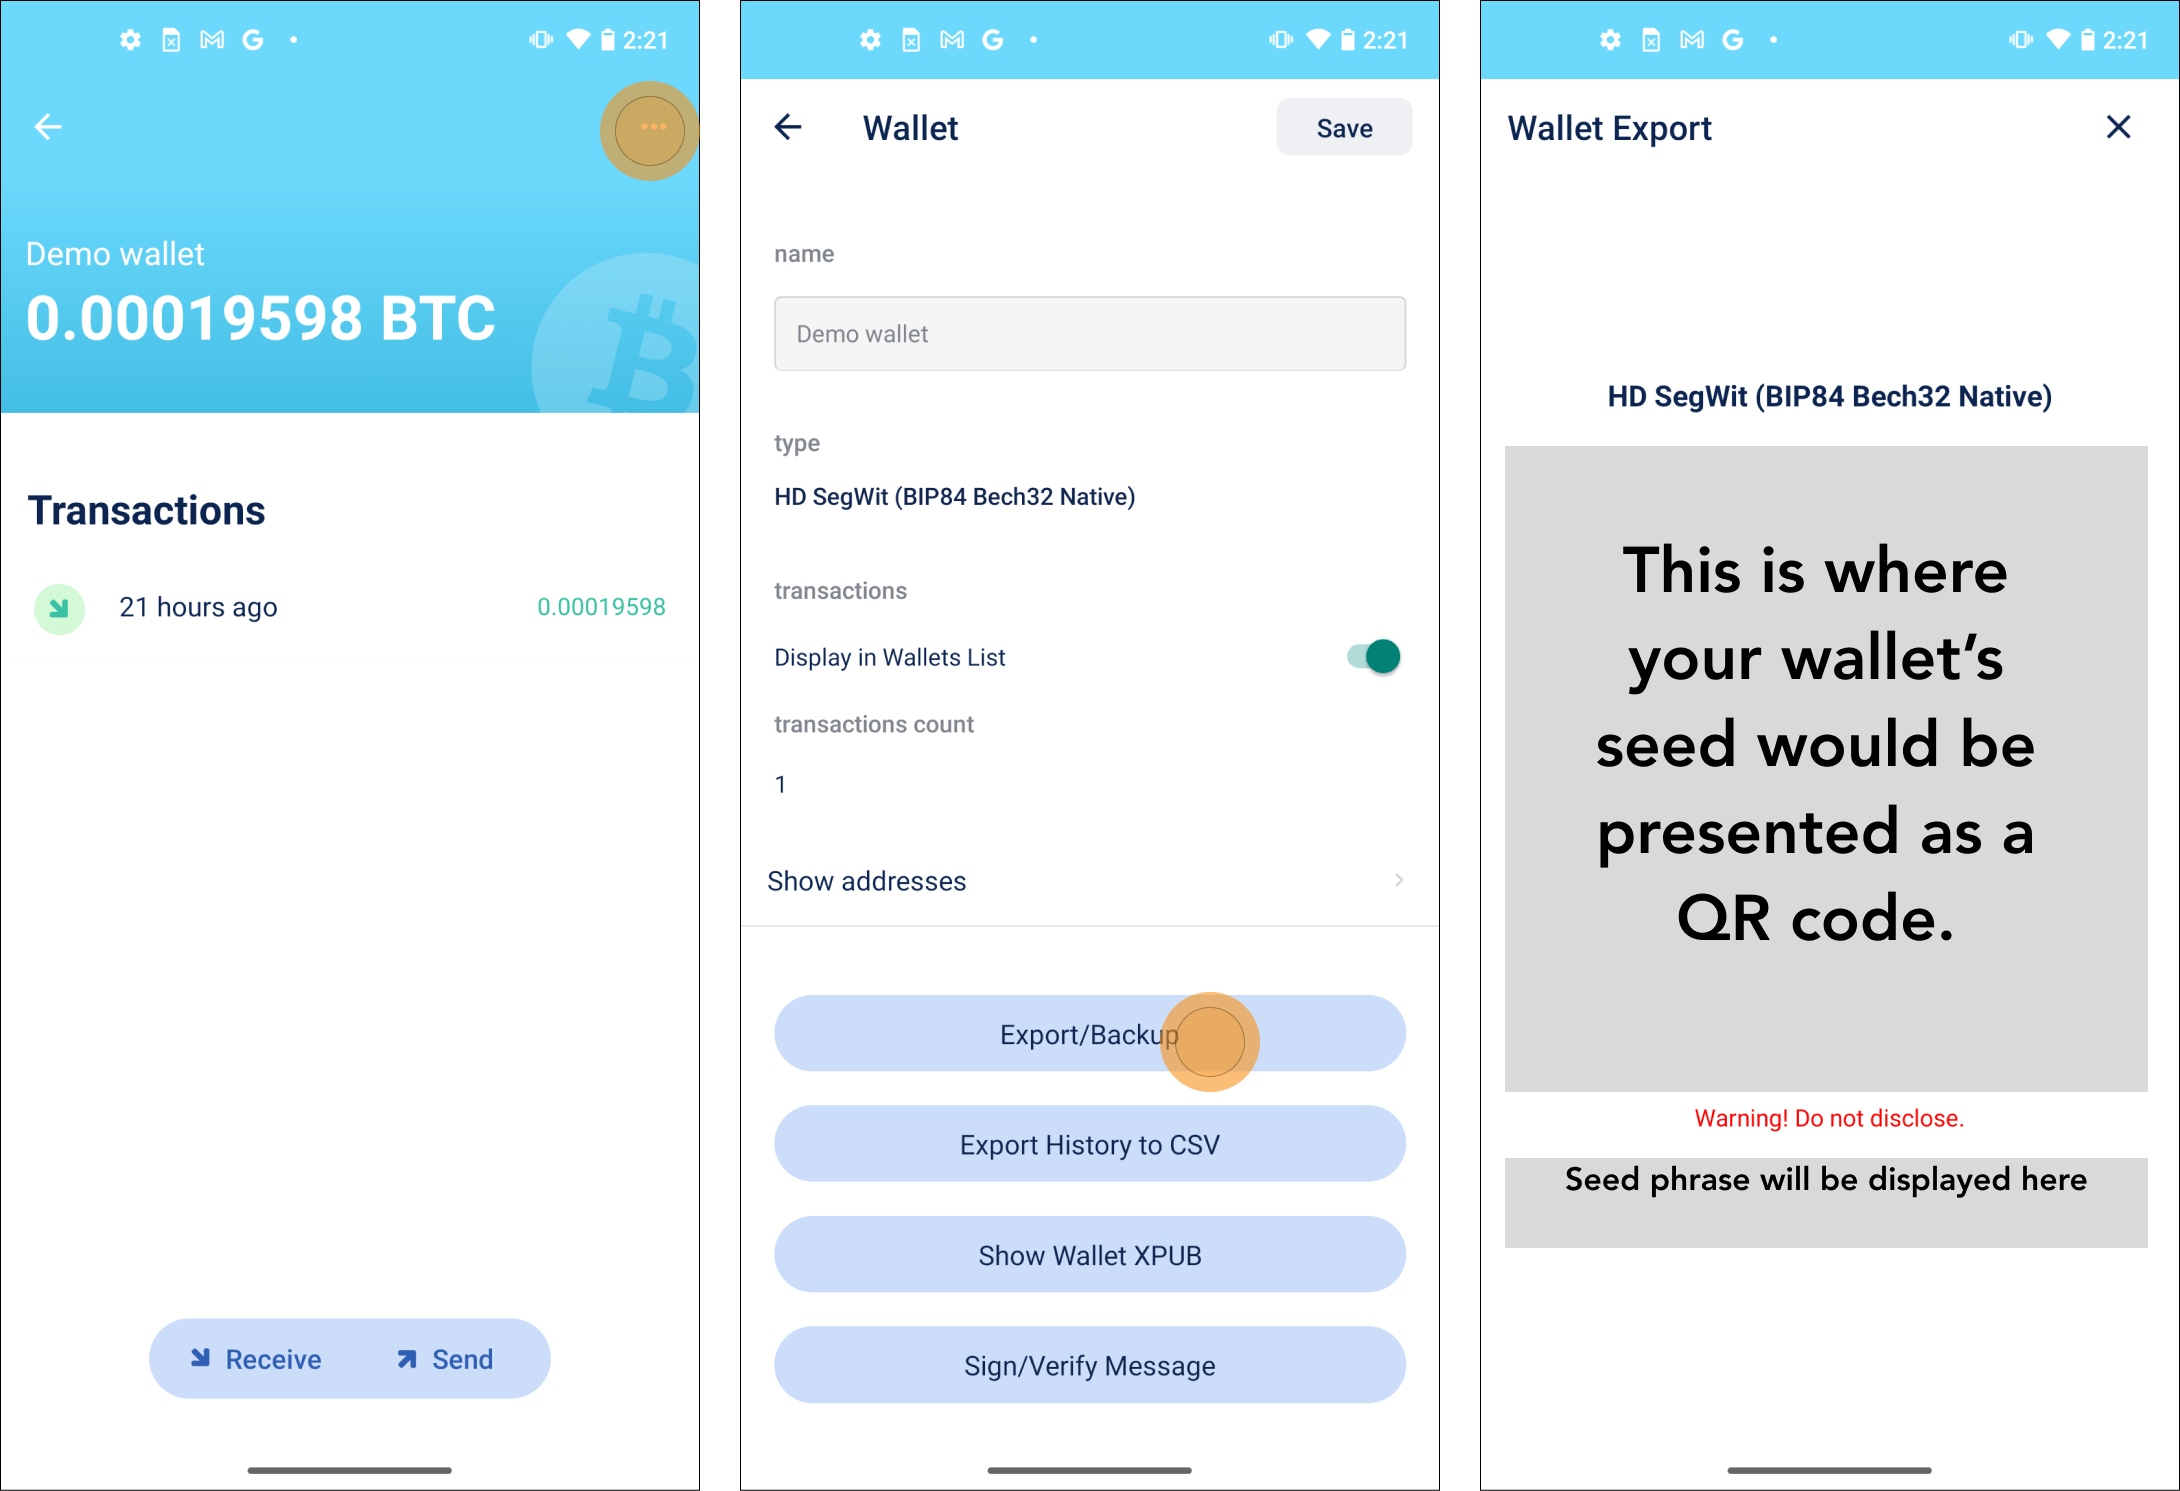
- Tap the
...button in the top right corner of the screen. - Then tap
Export/Backup. - Confirm that your written seed phrase is an exact match to what’s shown on the screen.
Once your backup has been verified against the screens above, you are ready to delete your wallet and restore from the seed phrase.
- Tap the
...button in the top right corner of the screen. - On the wallet screen, scroll down until the
Deletebutton is visible and tap it. - You will be prompted to enter the wallet’s current balance before deleting; enter the balance and tap
Deleteas shown in screen #3 below.
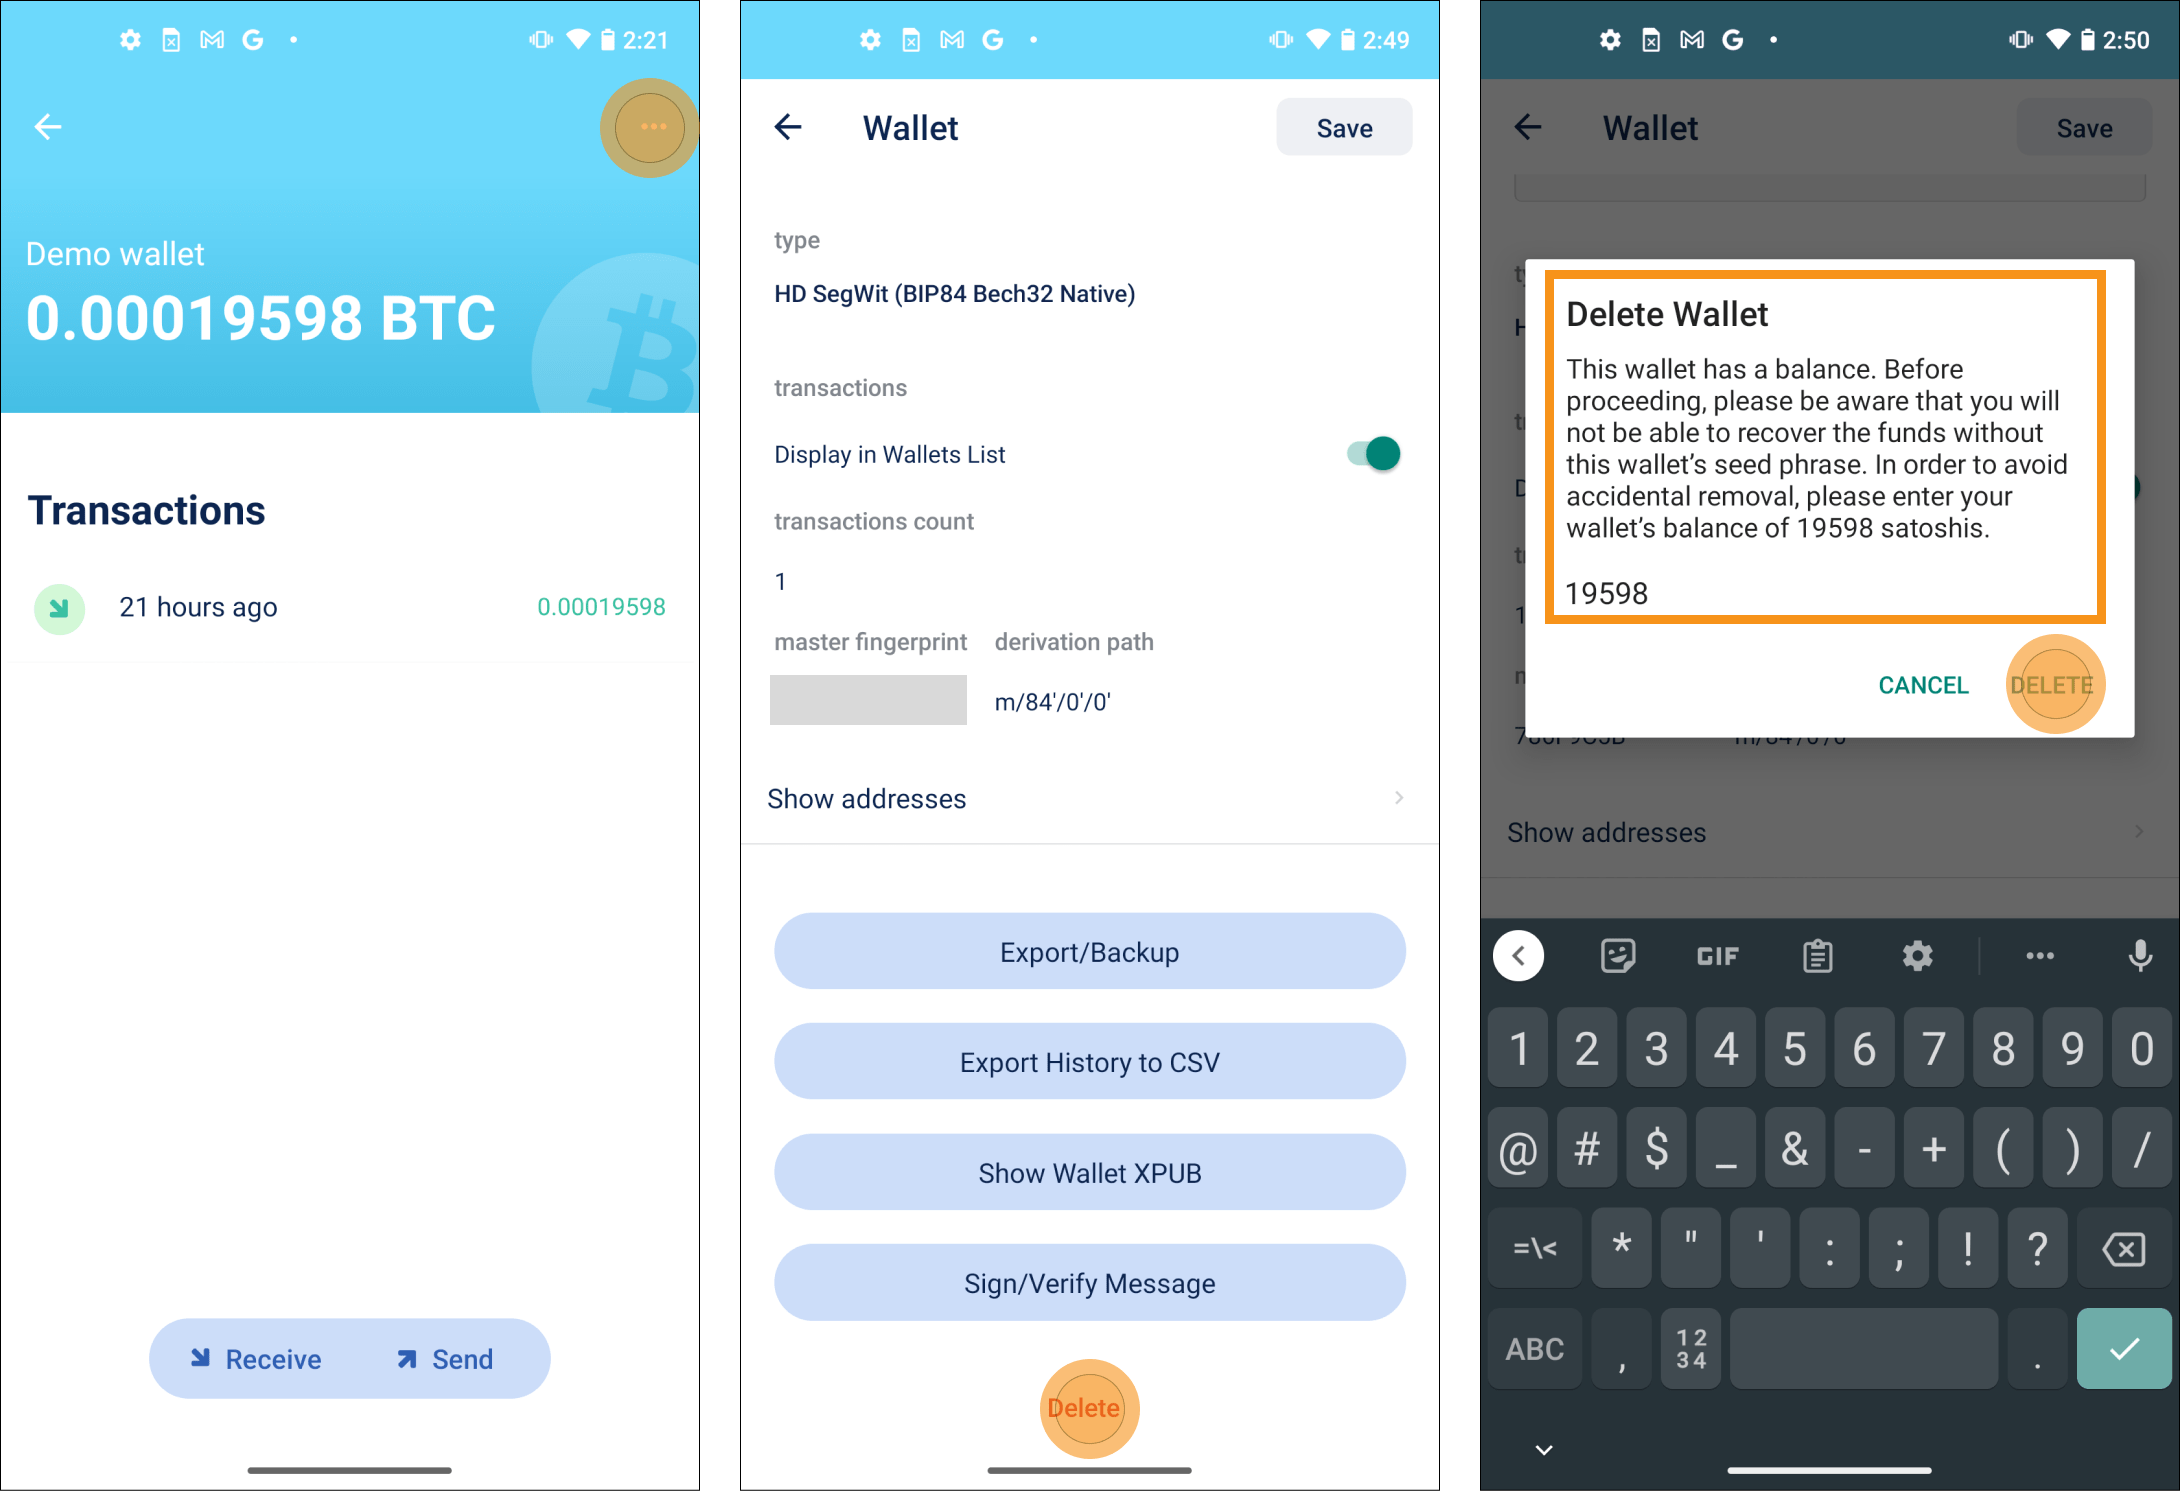
Your wallet is now successfully deleted from the application. Next, you will import the exact same wallet you deleted back into the application using your seed phrase.
- First, navigate back into the “Add Wallet” screen and tap
Import Wallet. - You will then be taken to the “Import” screen where you will type your twelve seed words inside the grey box. Add a single space between words and do not capitalize any.
- Once all words are entered tap
Import. - You will next see a loading screen and, assuming you correctly entered the words, a pop-up will indicate that the wallet import was successful!
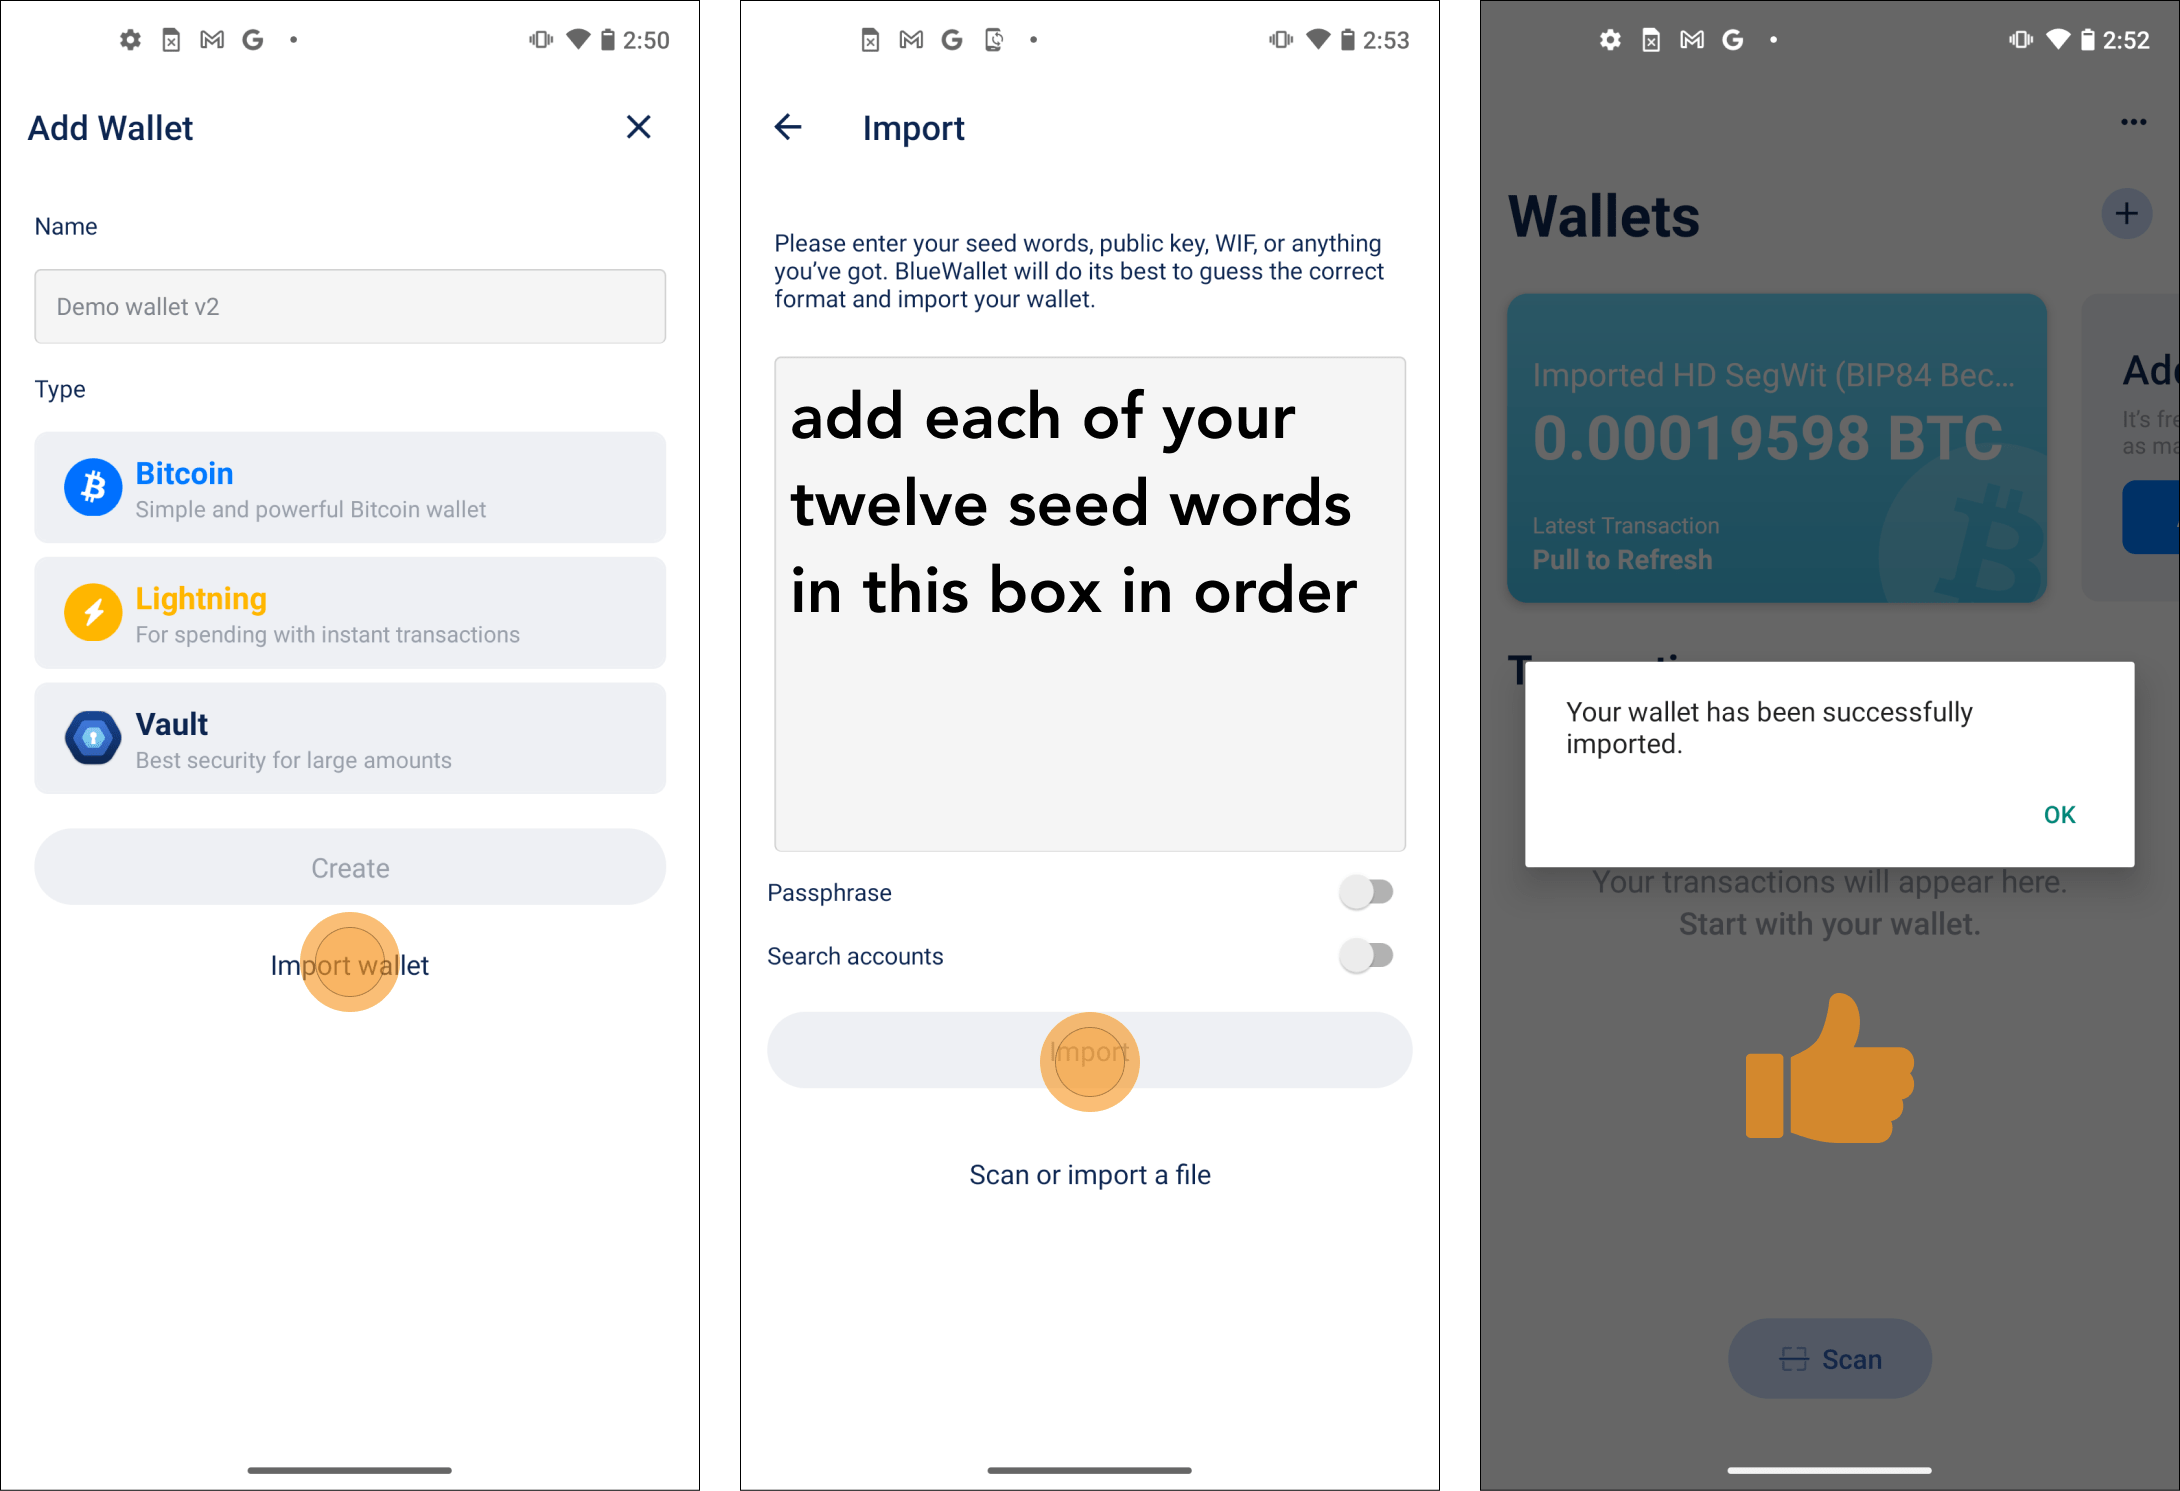
The wallet will be named “Imported HD SegWit…” upon successful import, but you can rename the wallet however you prefer. At this point, you can feel comfortable sending any larger value transactions to this wallet.
Step 5: Sending transactions from your mobile Bitcoin wallet
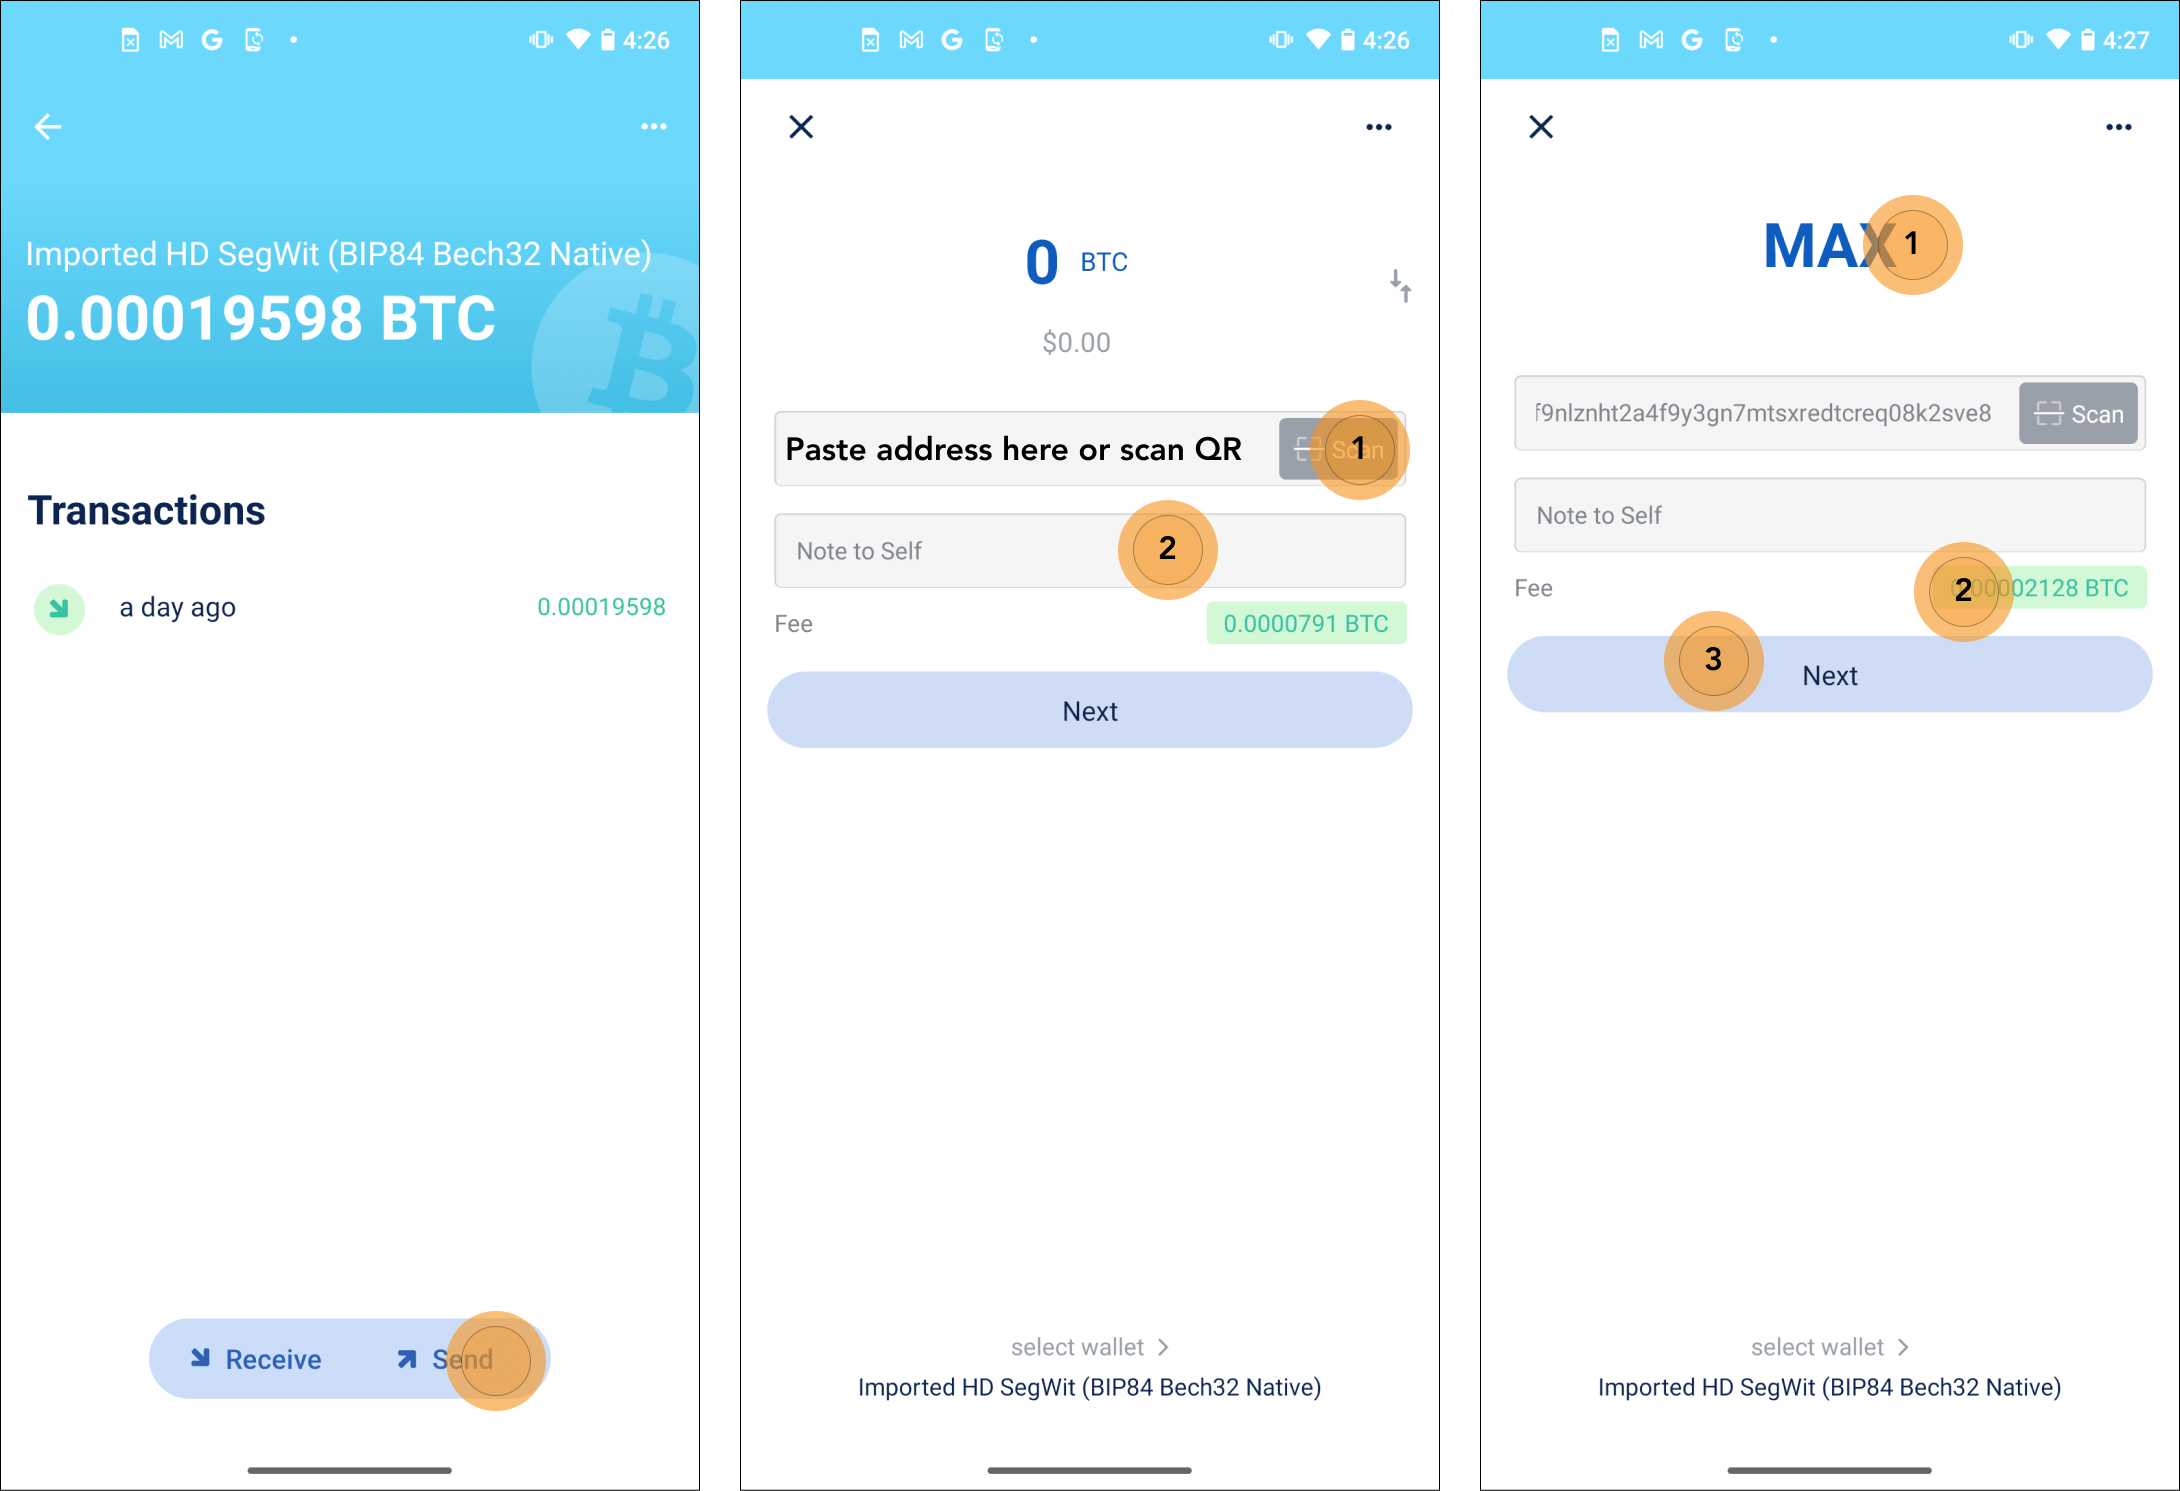
The final feature that we will cover in this guide is how to send bitcoin from your self-custody wallet.
- First, tap the
Sendbutton at the bottom of the screen. - You will next see the Send screen, here you can either paste an address from your device’s clipboard or scan the QR code of the address you intend to send to.
- Optionally, you can add a note to the transaction.
- Once an address has been populated, (1) select the amount of bitcoin you wish to send.
- (2) Your wallet will recommend a fee rate, but you can customize this value.
- (3) Press
Nextonce you have entered send and fee values.
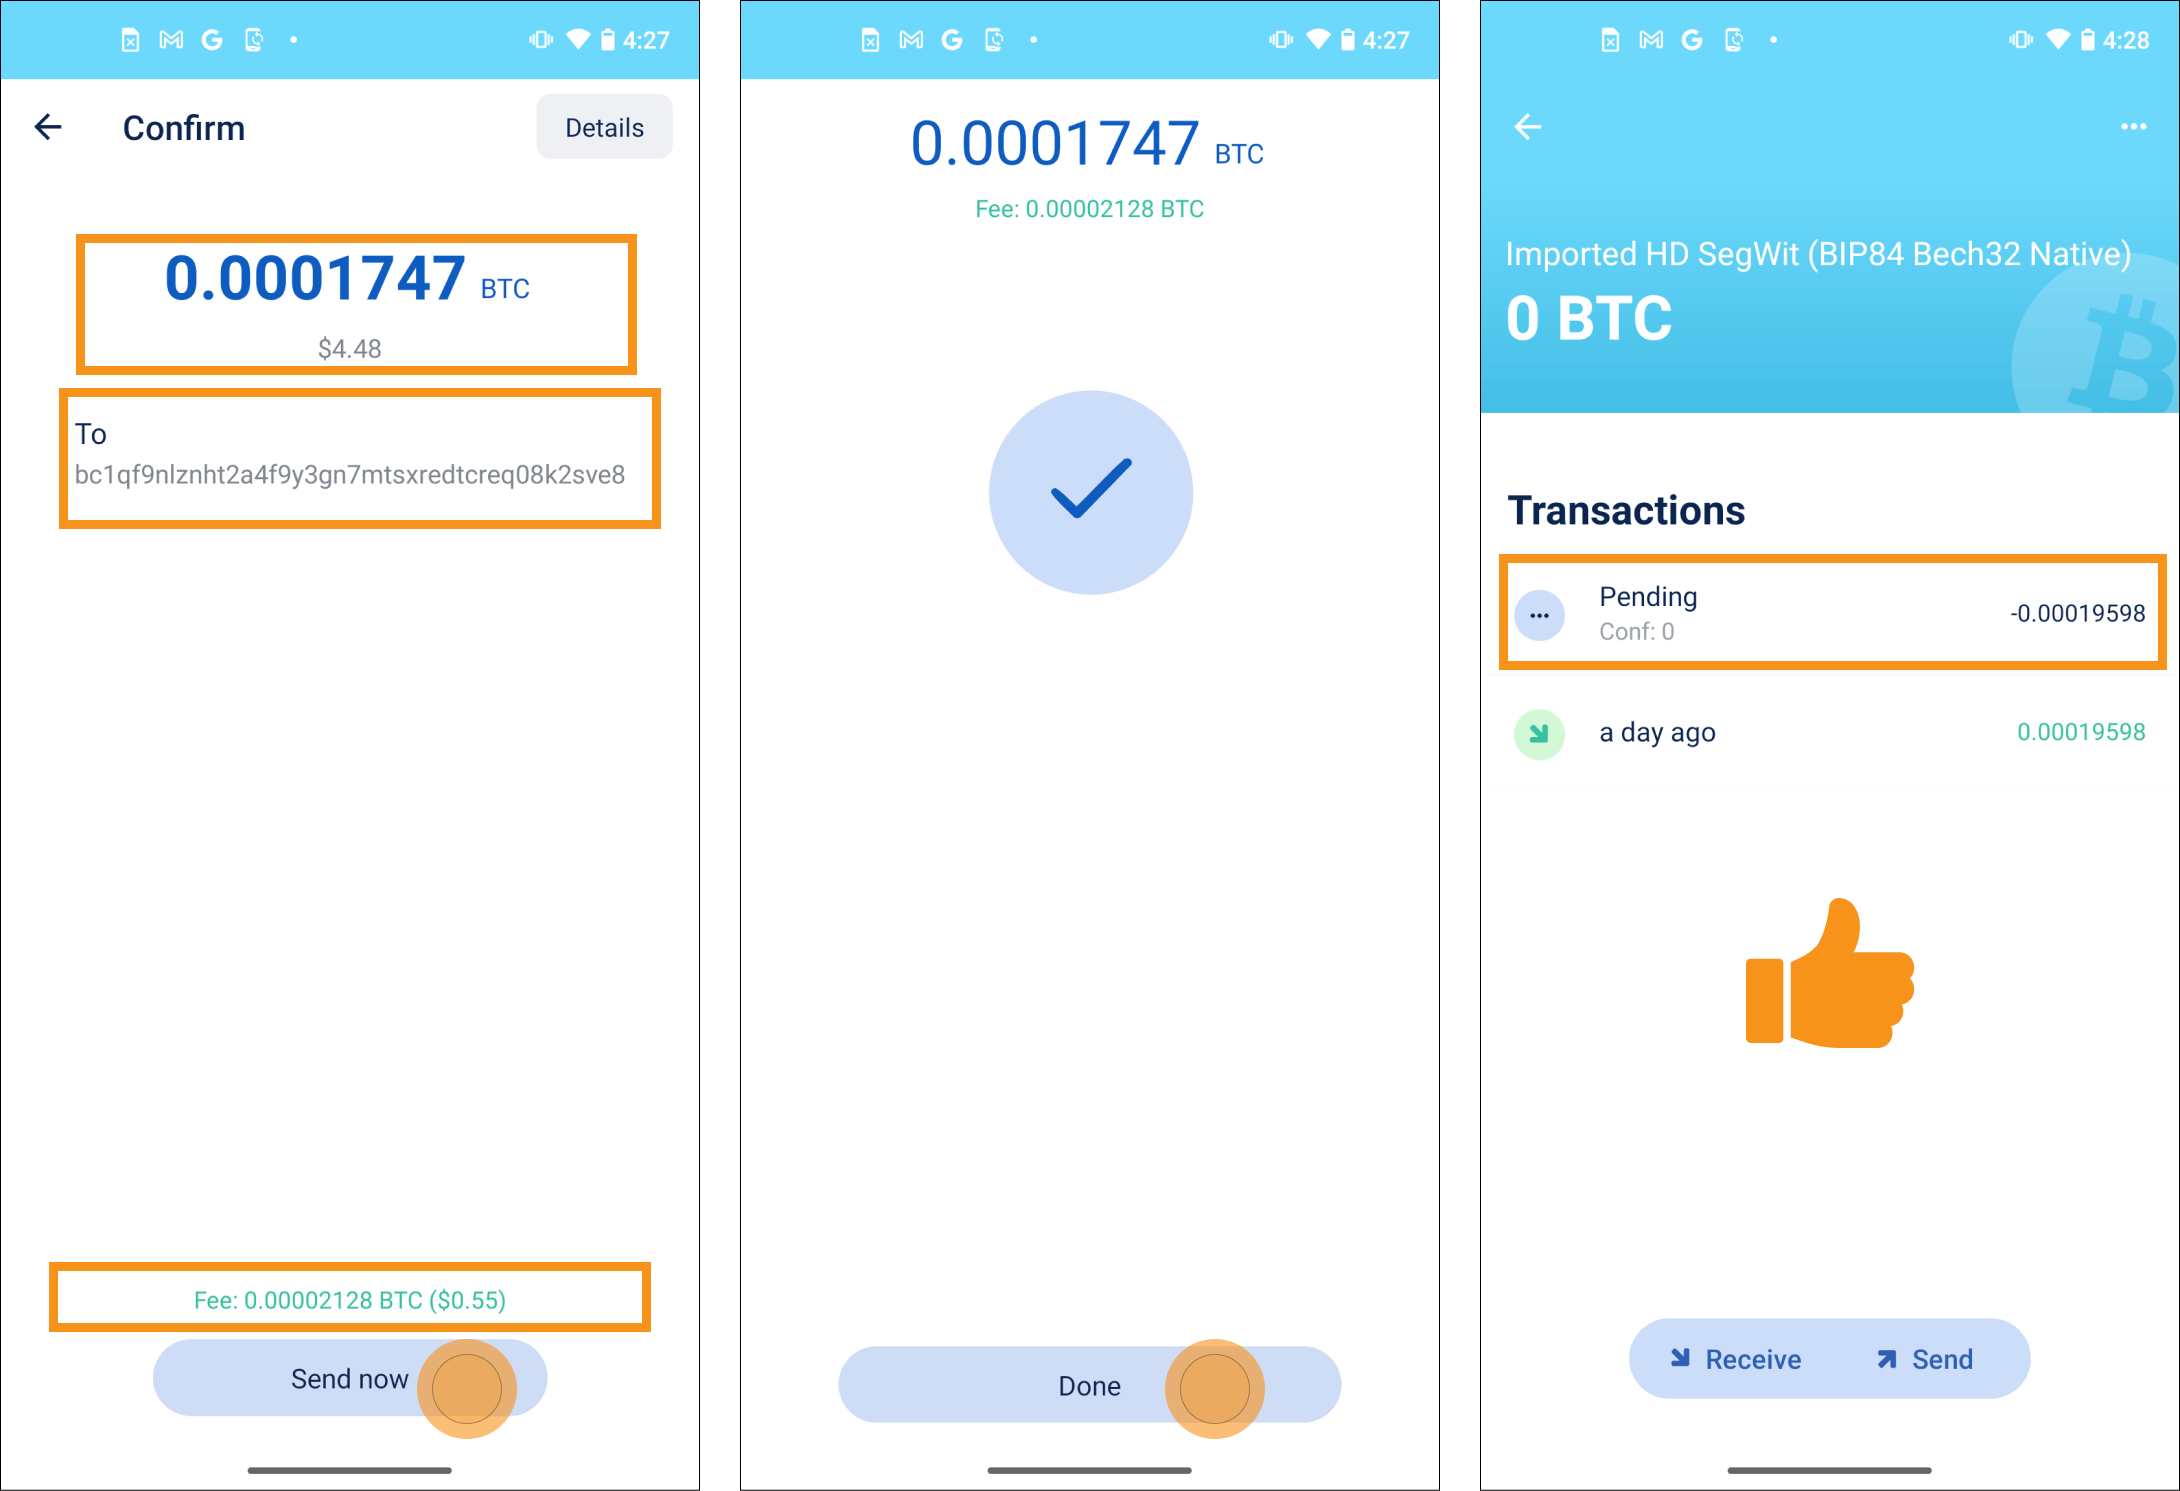
- You will then see a final transaction confirmation screen, make sure that:
- The amount of bitcoin you intend to send is correct.
- The address matches the intended recipient’s (a quick way to do this is to match up the first and last six digits of the address).
- The transaction fee matches what you previously specified.
- Once you have confirmed these inputs, tap
Send nowat the bottom of the screen. - If the transaction is successfully broadcast, you will see screen #2. Click
Done. - Back on the wallet home screen, you should see your sent transaction as “Pending”.
Congratulations! You have learned how to set up and back up a self-custody Bitcoin wallet.
You were able to receive a transaction, delete the wallet, and subsequently restore the wallet from its seed phrase. You then successfully sent the bitcoin back to yourself or someone else.
The best part about completing this tutorial is that the flow outlined above is nearly the same across all self-custody Bitcoin wallets. Empowering you to feel comfortable managing your own keys is aligned with the essence of Bitcoin: ultimately, users are in control of the network.
Additional resources for bitcoin self-custody
The purpose of this guide is to demonstrate how simple and powerful the process of self-custody can be. However, it is worth repeating that this guide covers a mobile (hot) wallet, and therefore cannot offer the same security assurances that a hardware or multisig wallet would provide.
As you become even more comfortable with self-custody, you will undoubtedly experiment with many different setups. To support your journey, we will provide some high-quality resources in this section for further learning.
Self-custody Bitcoin hardware wallets
The table below is not an exhaustive list of options, but it is a good place to start to learn more about which solution might be right for your particular circumstances.
| Device | Description | Recommended Resource |
|---|---|---|
| Coldcard Mk4 | Among the most trusted hardware wallets. Feature-rich, and highly secure. | Tutorial by Ian Major |
| Seedsigner | You can cheaply build this DIY device yourself which adds additional security assurances in the realm of manufacturer trust. | Assembly & Usage Tutorial by BTC Sessions |
| Foundation Passport | Open-source hardware wallet with a familiar, Nokia-esque feel, accompanying mobile wallet, and an intuitive user interface. | Tutorial by Ian Major |
| Blockstream Jade | Low-cost, open-source hardware wallet that offers plenty of features and pairs nicely with Green wallet on mobile. | Tutorial by BTC Sessions |
| BitBox02 (Bitcoin-only) | Swiss-made, sleek hardware wallet that comes with a complimentary microSD card and provides a streamlined user experience. | Tutorial by BTC Sessions |
| Trezor Model T / Model One | Simple-to-use, inconspicuous signing devices. Make sure to select the “Bitcoin-Only” firmware option upon initialization. | Tutorial by theBTCcourse (Model One + Bitcoin-only firmware) |
| Ledger Nano X / Nano S Plus | Easy-to-use wallet for beginners from the largest manufacturer in the space. For maximum security, only use this product for bitcoin. | Tutorial by theBTCcourse (applicable to both models) |
Importantly: from time to time, hardware wallets will find bugs and/or vulnerabilities in their devices. As such, it is wise to monitor your chosen wallet’s social media or GitHub activity in order to occasionally update when bugs or vulnerabilities are discovered and subsequently fixed.
This is relatively standard in the hardware industry, and should not be a cause for concern. If you (or your firm) custody over $75k of bitcoin, it is prudent to consider multisig solutions.
Seedless bitcoin custody wolutions
While seed phrases have long been the standard for Bitcoin self-custody, they place the full responsibility of secure storage on the individual—introducing the risk of irreversible fund loss if the phrase is lost or compromised.
Seedless self-custody solutions eliminate the need for mnemonic phrases entirely. This approach is appealing to users who may be uncomfortable managing complex technology or the high-stakes burden of traditional wallets.
A popular example is Bitkey (by Block), which enables users to distribute control across multiple devices or trusted contacts. This design ensures that losing a single device doesn’t result in the loss of access.
Multisig bitcoin custody solutions
Multisig Bitcoin wallets are some of the most secure custody options available, but effectively managing one requires specific operational knowledge. For example, in order to backup a 2-of-3 multisig setup, you would need to maintain at least two of the three seed backups for your signing devices, in addition to all three xpubs for those signers.
Thankfully, there are services that offer assisted multisig—where you hold two keys, and your service provider holds one (in case you lose a key). Here, you would still be able to unilaterally exit the multisig wallet without permission from the service provider.
- Unchained is a Bitcoin-only company with a track record of bringing excellent products to market and providing quality service for clients.
- Casa, founded in 2016, is a multisig service provider that offers a suite of additional products and services.
- Nunchuk is a newer player in the multisig space but has rapidly developed a variety of security products and strong industry partnerships.
Conclusion
The ability to hold your own keys and be your own bank is one of the many reasons that Bitcoin continues to grow in popularity around the world. While it may seem intimidating at first, the importance of self-custody cannot be overstated.
With that said, this journey is a marathon, not a sprint.
This is precisely why we have created this mobile wallet guide as a means to demonstrate how powerful, yet how simple self custody can be. If you followed all the steps in this guide, and perhaps left some bitcoin on your mobile wallet—you can rest easy knowing that, as long as you secure your backup—that bitcoin will be in the exact same address years from now.
Take things one step at a time, test out different wallets, and share your knowledge with friends and family!
Key Takeaways
- Bitcoin wallets themselves do not control bitcoin, funds can only be moved with private keys.
- A wallet's seed is a large, random number. It is represented as 12 or 24 words to be easier to read by humans.
- If a wallet's seed is properly backed up, you can import that same wallet into any software or hardware wallet you'd like.